| What
is a conventional garden?
A conventional garden is one in
which a large area is planted in rows at the
ground level. Though these gardens have been
the norm in our region for years past, many
home gardeners are switching to raised bed gardening
which is much easier, less expensive, and less
time consuming. Conventional gardening takes
more time out of busy lives. Conventional gardening
requires more fertilization, compost, weed and
insect control, as well as back breaking tilling
of soil and picking of vegetables. We won't
spend much time here getting into the ins and
outs of conventional gardens as there are so
many benifits to gardening in raised beds.
What
is a 'raised bed' garden?
The 'raised' part means that the
garden soil level is higher than the surrounding
soil, and 'bed' implies size small enough to
work without actually stepping on the bed. A
bed should be no wider than 4' but can be as
long as desired. The bed does not have to be
enclosed or framed, however framing offers other
opportunities. Raised bed gardens are perfect
where space is limited.
There
are many reasons for the raised bed revival,
but probably the most important reasons are
the greater level of production per square foot
of garden and the ease of working. Studies have
shown that the average gardner can produce twice
the amount of vegetables per square foot in
raised beds as opposed to conventional gardens.
Raised beds don't require as much space between
rows because no walking is done inside the bed
to cultivate or harvest. Hence, vegetables are
spaced in raised bed at a distance just enough
to aviod crowding, but close enough to shade
out weeds.
Another
reason for increased production in a given space
is improvement of soil conditions. There is
no compaction of soil in a raised bed as there
is no treading or tilling performed with heavy
tillers or tractors. Compost or other soil ammendments
can be added in greater amounts to the smaller
areas of beds with none going to waste. Raised
beds also keep the moisture content of the soil
more consistently even during excess rain periods.
Most vegetables do not like wet feet.
The
gardener shares some benefits from raised bed
gardening too. The foremost is timely planting.
Conventional gardeners must wait for a dry period
to begin planting, however raised beds don't
get boggy and can be planted whenever the gardener
is ready. Rows between beds can be sodded, mulched,
or paved with bricks or steppings stones to
avoid muddy feet. Raised beds also make it easier
come harvest time because the gardener doesn't
have to bend over as far, if at all. Raised
beds can be from 6" to 24" in height,
or higher. Pest control becomes easier too.
Before building a raised bed lay some chicken
wire or hardware cloth down to discourage moles.
Low fences can be attached to discourage rabbits
or other small animals from entering the bed.
Plant perennial 'Bog Salvia' plants nearby the
bed(s) to repel deer. Weed control can be achieved
much easier in beds with weed barrier fabric.
Raised
beds are also perfect for drip or soaker hose
irrigation where water can be dispersed only
where it is needed. Soaker hoses also reduce
disease. Design your beds keeping the length
of irrigation hose and the width of weed barrier
fabric in mind.
Certain
vining vegetables such as squash, cucumbers,
and melons may not be suitable for raised beds
and might be better grown in other areas at
ground level.
Constructing
a Raised Bed - There are only a few
guidelines to follow when constructing a raised
bed vegetable garden. Keep the beds narrow and
match their length to watering systems. A north-south
orientaion is best for lower growing crops,
allowing sunlight to both sides of the bed.
An east-west orientation is best for taller
growing vegetables such as pole beans, corn,
caged tomatoes and okra. Thus lower growing
vegetables could be planted on the south side
of the bed and still recieve full sun.
Avoid
the use of creosote or pentachlorophenol-treated
lumber as these agents are toxic and will leach
into the garden soil and injur plants, and you
as well. Use pressure treated lumber, stone,
wall blocks, or brick.
The
soil in the bed should consist of at least one-third
native soil, even if it is heavy clay. Blend
the native soil with plenty of compost adding
sand if you like to achieve sufficient soil
level in the bed. Make sure to add about 40
lbs of pelletized lime per 500 sq. ft. of bed
space to adjust ph.
Raised
bed possibilities are endless. Beds of 24"
or higher require very little bending to work
in the garden. Benches can even be built to
make working in the garden even easier. Because
a raised bed warms up quicker than the ground
they can easily be used as a cold frame by covering
with clear plastic, allowing then to be planted
earlier and protected during a late cold spell.
Supports for poles, cages, or trellises can
be mounted to the frame for longer life and
ease of installation or removal.
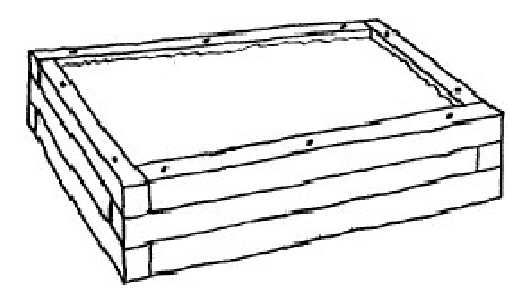
Perhaps
the easiest and most practical way to build
a raised bed is with landscape timbers. Treated
landscape timbers, as shown in the diagram below,
are available in several sizes make an attractive
bed and last for many years. Research has shown
that the treatment used on these timbers does
not leach into garden soil and injur plants.
Drill holes into timbers every 4 feet as you
build the bed walls so that you can drive rebar
through to a depth in the soil equal to the
height of the wall.
If
you use dimensional lumber such as 2x8's to
build the side walls with you will need to use
decay-resistant wood stakes to hold the wall
in place. Attach the stakes with screws to the
inside of the wall and they will not be noticed.
For
a unique-looking raised bed cut landscape timbers
off at a length of 2-4' and set the posts vertically
in the ground, half buried and half above the
ground.
 |
|
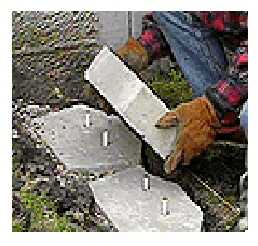
Modern
wall blocks are also great for use to build
raised beds. Wall blocks will cost more,
but last much longer. Make sure that the
blocks you use are interlocking and suitable
for use at the height you want to build
to. |
After
building your raised bed walls and have backfilled
with the soil mixture you are ready to plant.
Below is a listing of vegetables that perform
well in Zone 8.
Plant |
Spacing |
| Asparagus |
14" |
| Bush
Beans |
4" |
| Pole
Beans |
36" |
| Beets |
4" |
| Broccoli |
24" |
| Brussel
Sprouts |
18" |
| Cabbage |
24" |
| Carrots |
2-4" |
| Cauliflower |
15" |
| Corn |
3" |
| Cucumbers |
48" |
| Eggplant |
24" |
| Lettuce |
8-12" |
| Okra |
12" |
| Onions |
3" |
| Peas |
3-6" |
| Peppers |
24" |
| Potatoes |
8" |
| Pumpkins |
6-8" |
| Radishes |
1-3" |
| Spinach |
6" |
| Squash |
36" |
| Tomatoes |
36" |
| Watermelons |
72" |
Hardiness
& Days to Maturity Chart
Crop |
Hardiness |
Days
to Maturity |
| Asparagus
|
Perennial,
winter tolerant |
Second
Season |
| Bean,
bush |
Tender
|
50-60
|
| Bean,
pole |
Tender |
65-75
|
| Bean,
lima |
Tender
|
65-75 |
| Beet |
Half-hardy |
55-65
|
| Broccoli
|
Hardy
|
60-80
|
| Cabbage
|
Hardy
|
65-80
|
| Cantaloupe
|
Very
tender |
80-90 |
| Carrot
|
Half-hardy
|
70-80
|
| Cauliflower |
Half-hardy
|
55-60
|
| Collard
|
Hardy
|
55-70
|
| Corn
|
Tender
|
80-100
|
| Cucumber
|
Very
tender |
60-65
|
| Eggplant
|
Very
tender |
75-90
|
| Kale
|
Hardy
|
50-70
|
| Lettuce
|
Half-hardy |
60-85
|
| Mustard
|
Hardy
|
40-50
|
| Okra
|
Very
tender |
55-60
|
| Onion
|
Hardy |
100-120
|
| Peas,
garden |
Hardy
|
60-80
|
| Pepper
|
Very
tender |
65-80
|
| Potato,
Irish |
Half-hardy |
70-90 |
| Radish |
Hardy |
25-30
|
| Southernpea
|
Tender |
60-70
|
| Spinach
|
Hardy
|
40-45 |
| Squash,
summer |
Very
tender |
50-55
|
| Squash,
winter |
Tender
|
85-120
|
| Sweet
potato |
Very
tender |
90-150
|
| Tomato
|
Tender
|
70-85
|
| Turnip
|
Hardy |
45-65
|
| Watermelon
|
Very
tender |
80-90
|
When
to Plant Summer Vegetables
- Typically, April 15 is the starting date for
planting your summer vegetable garden in Zone
8. We usually have no more frost after this
time. You may plant tomatoes in the garden earlier,
however be ready to cover the young plants with
clear plastic or milk jugs if a frost is forecasted.
Starting your vegetable plants from seed indoors,
or in a backyard greenhouse, is a good way to
get a head start.
Adding
Organic Matter - Between each growing
season till or turn in a 1/2" layer of
homemade compost or other organic matter such
as Claycutter, Mushroom
Compost, or Composted Cow Manure.
The past seasons crop will have depleted organic
matter and beneficial bacteria needed for healthy
and vigorous growth.
Fertilizing
- Fertilize your vegetables with 5-10-15 or
Milorganite every
4 weeks or so, or if you are an organic gardener,
continue to broadcast your homemade compost
from time to time around the root systems of
your plants throughout the growing season.
Insect
Control - For insect control in the
garden you can use Liquid Sevin
or Malathion. Always follow
instructions on the product label for mixing
and application rates. If you are an organic
gardener you can use Safer Insecticidal
Soap or Safer Tomato & Vegetable Insect
Killer for insect control in the garden.
Safer also makes 3-In-1
Garden Spray, which includes insecticidal
soap for insect control, sulfur fungicide, and
neem oil. This spray does not harm beneficial
insects and can be used on vegetables or any
other plants with complete safety around pets
and children.
Disease
Control - For disease control in the
vegetable garden we recommend using Safer
Garden Fungicide, which can also be
used on fruits, flowering plants, ornamentals,
and roses to prevent black spot, rust, leaf
spot, and powdery mildew. Safer
also makes 3-In-1 Garden Spray,
which includes insecticidal soap for insect
control, sulfur for fungicide, and neem oil.
This spray does not harm beneficial insects
and can be used on vegetables or any other plants.
Use Bonide Rot Stop on tomatoes
to control blossom end rot.
Make Your Own Organic Compost
|